总所周知,科技的进步离不开人们的懒惰。你能容忍在学校每天早上来电时,被昨晚忘记关的灯亮醒吗?你能容忍躺在温暖的被窝却不愿意去关忘记关的灯吗?!我也一样,由于不想每天下床关灯,我在我家以及宿舍安装了自制的远程蓝牙灯光控制系统~
Ⅰ.准备材料
- ESP32开发板WIFI+蓝牙
- 杜邦线(公对母3条以上)
- MG90S舵机1个
- 热熔胶枪(能粘住插座旁边东西的胶水都可以 但是强烈推荐热熔胶,以免对墙壁造成永久伤害!)
- 3D打印机(可以没有)
Ⅱ.开始改造
每个人的家都不一样,灯的开关样式也不相同,我家的就是这样的开关:
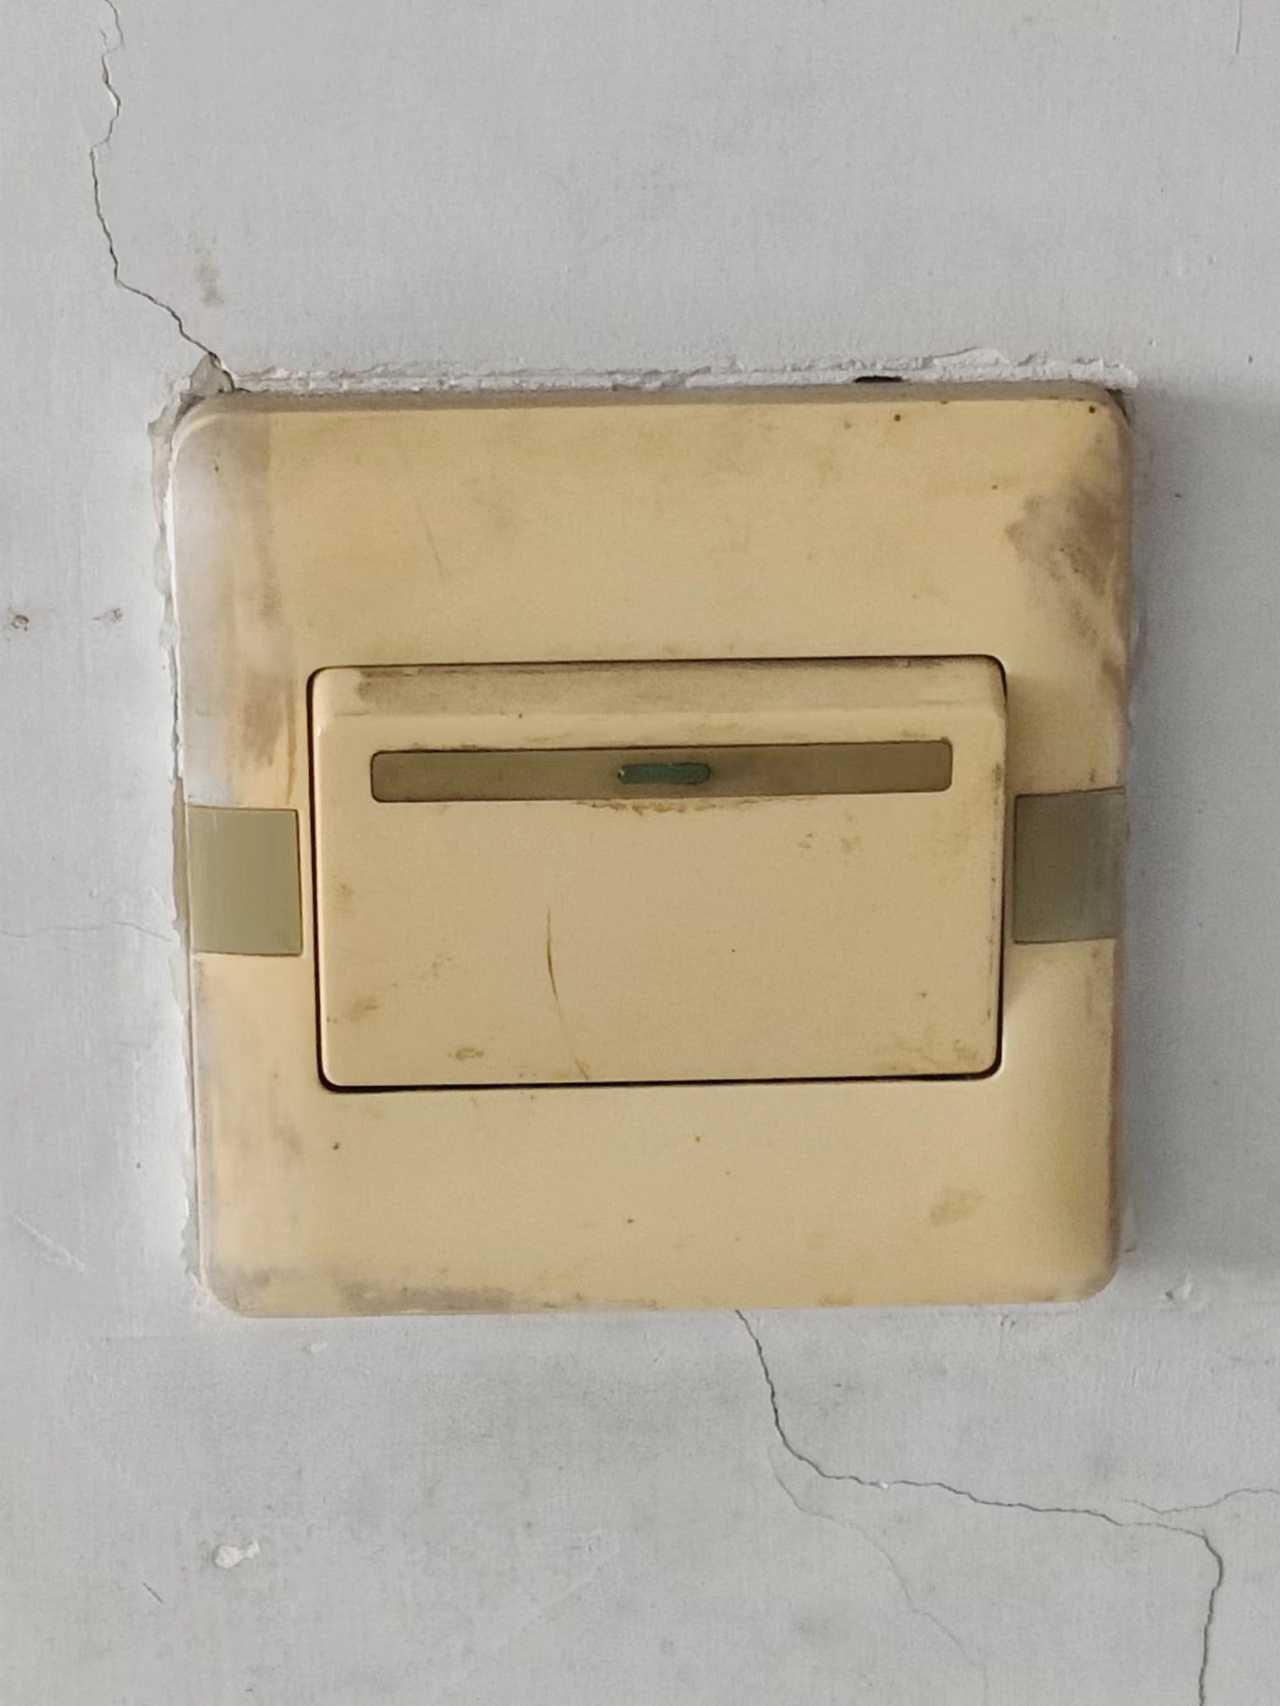
然后我们通过3D打印机打印出刚好合适框住开关的框架(没有打印机的可以拿其他物品代替,只要能垫高舵机即可)注意框架的厚度不能太高也不能太低,舵机水平叠在框架上的时候不能碰到按钮,转动的时候要尽可能地以最小转动角度碰到开关
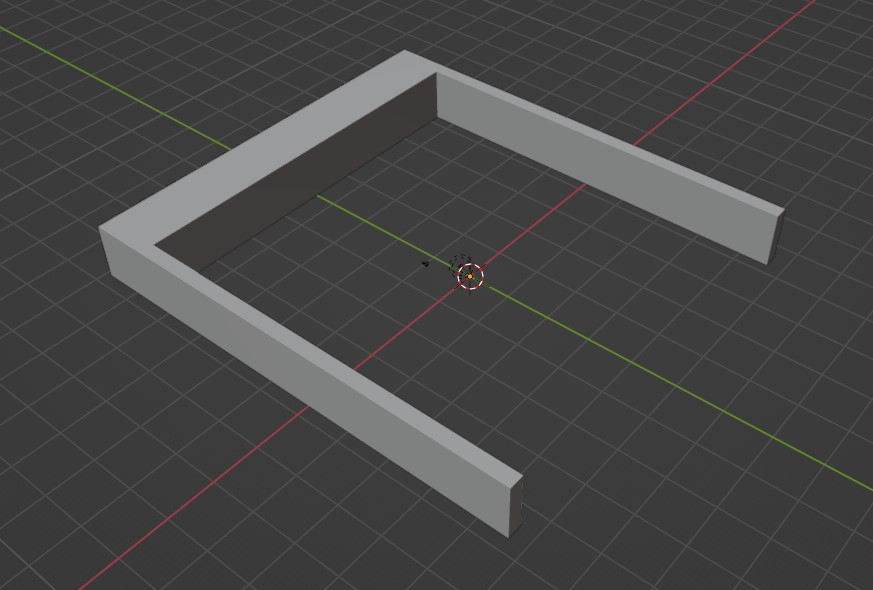
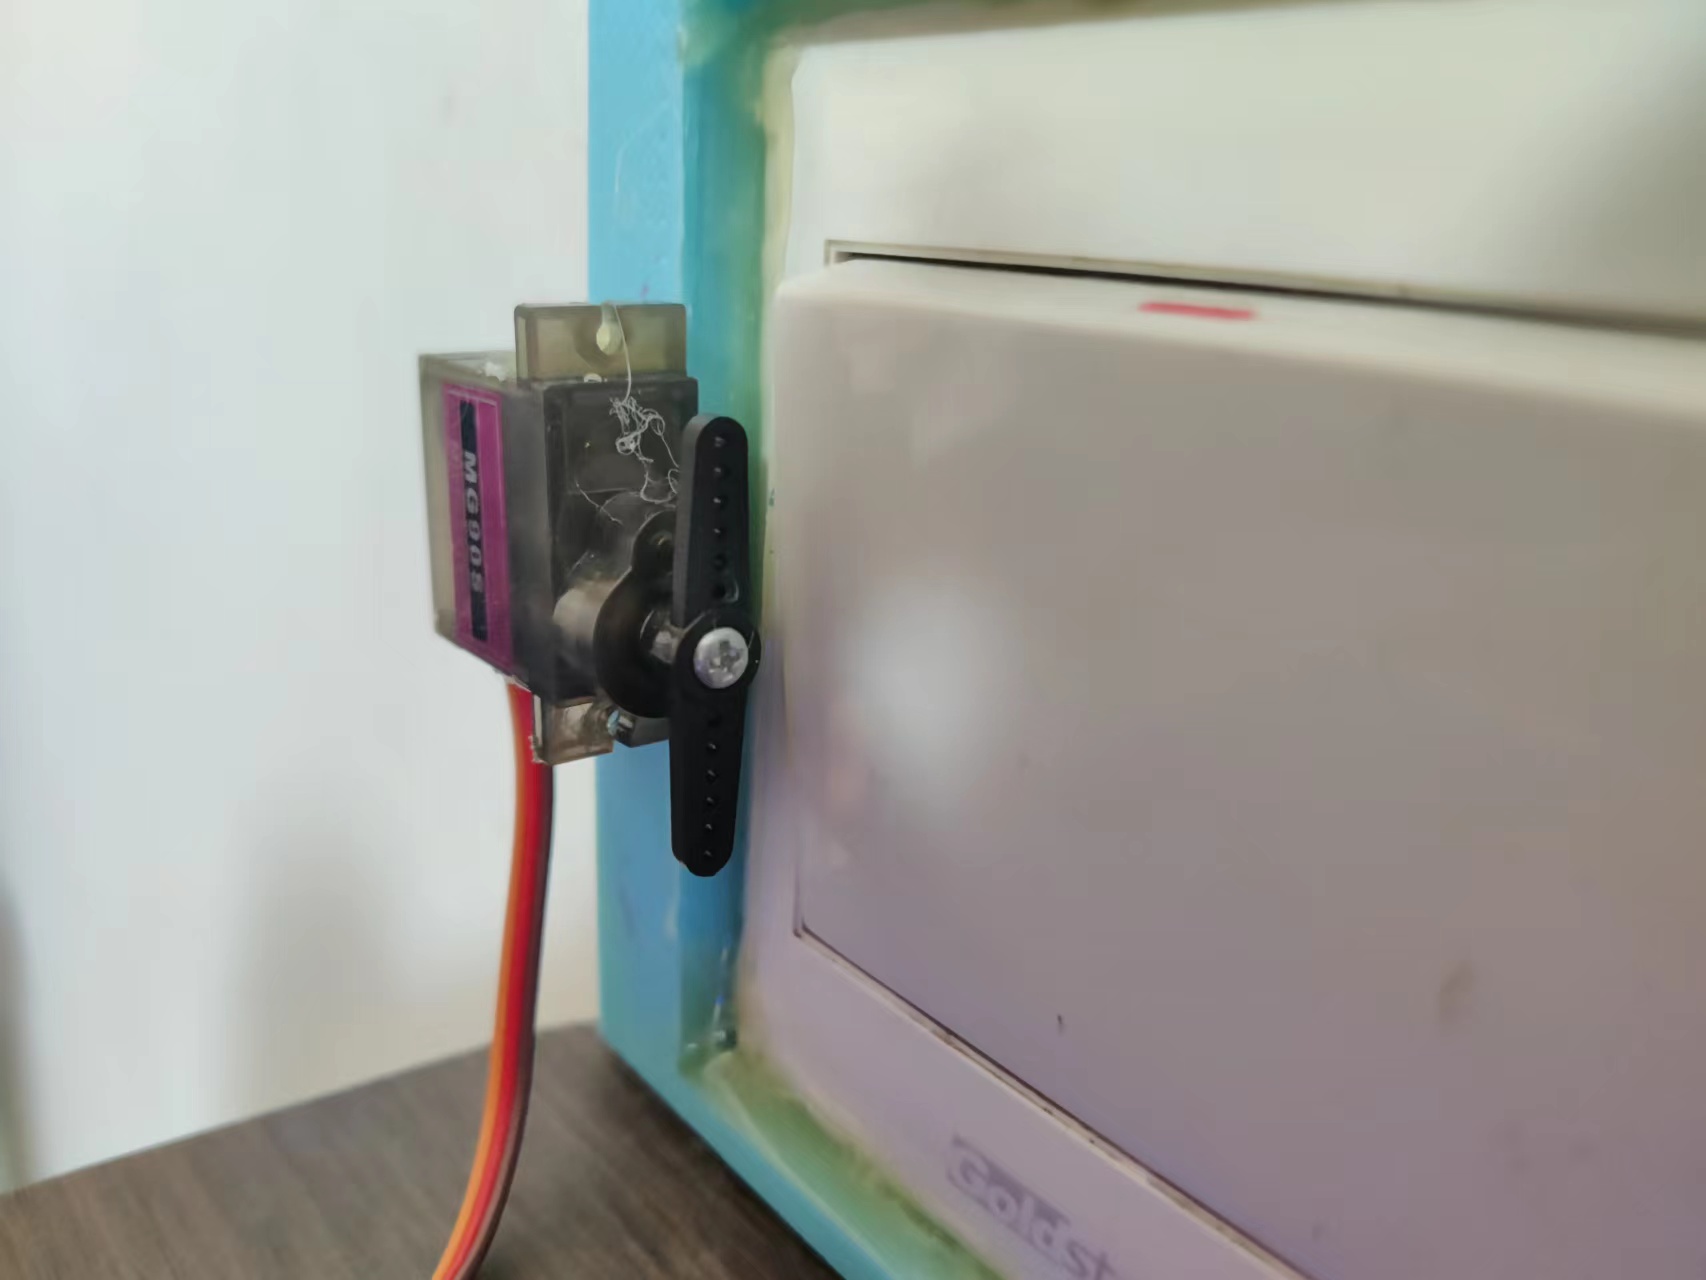
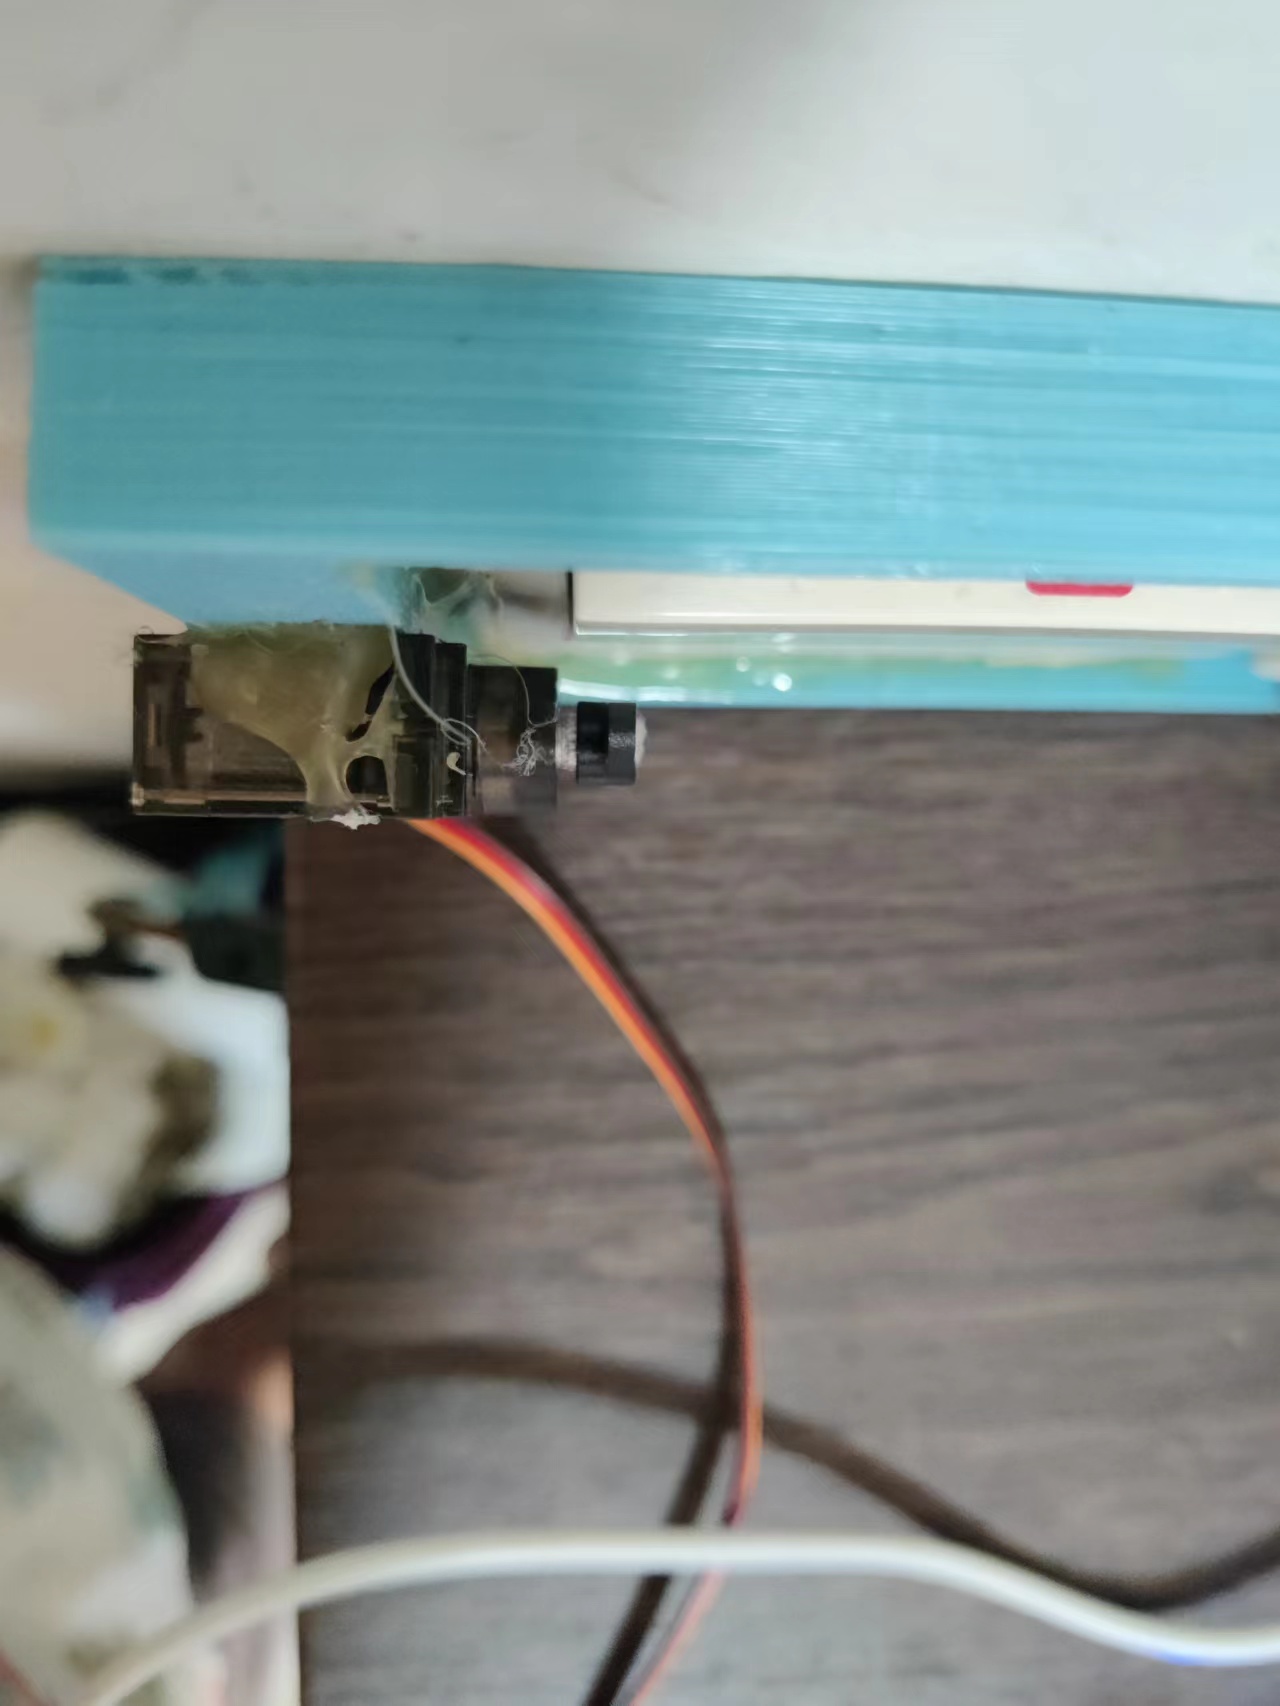
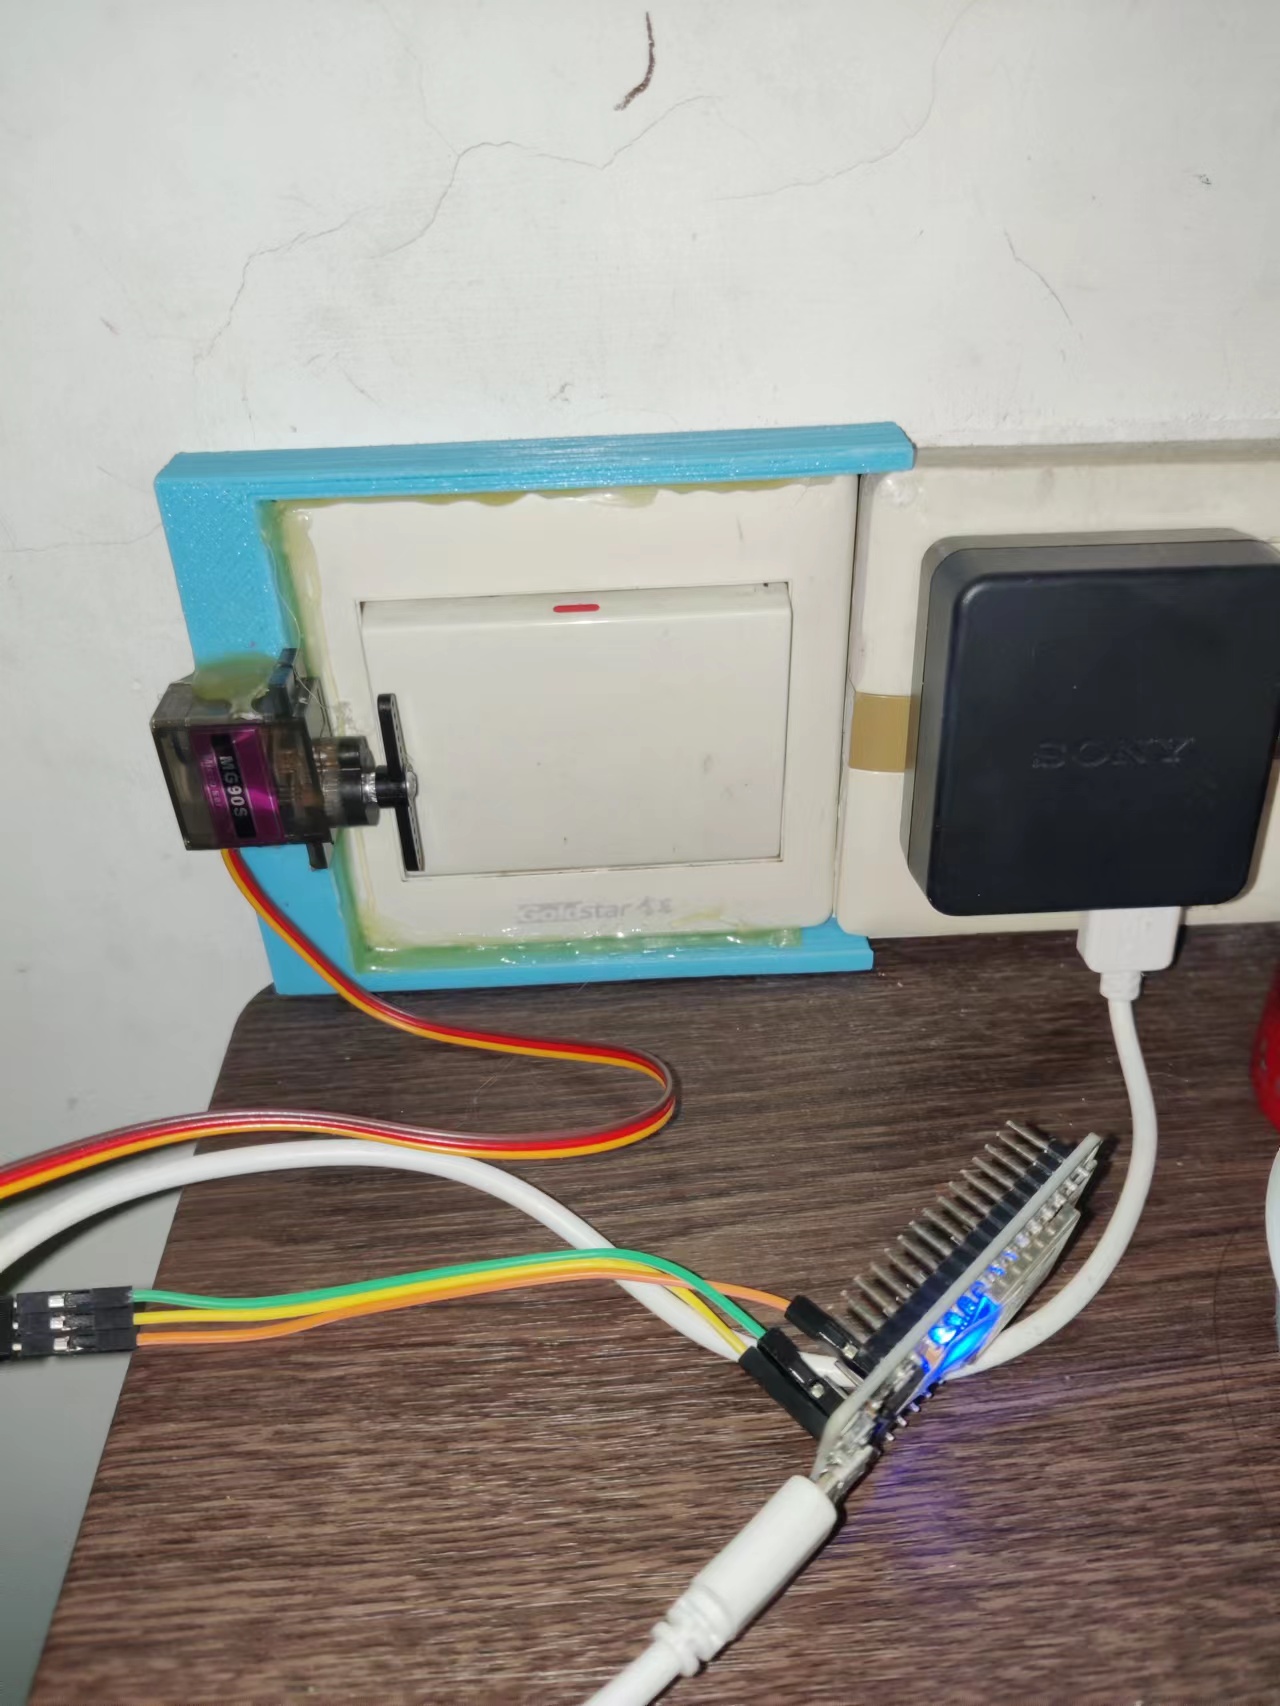
然后,我们就可以进行组装啦,将框框套入开关旁边,然后用热熔胶固定住边框(不建议直接粘在墙上,妈见打 可以把胶水涂在内部与塑料粘住)然后就将舵机也粘上去,如图:
Ⅲ.编写代码
我们需要给我们的单片机注入“灵魂”,这样的单片机才能辛苦地给我们卖命。对于esp32,你可以采取多种方式给他赋予灵魂。
你可以使用Arduino的方式烧录,我这边选择使用VScode+PlatformIO的方式(其实也是Arduino框架)。式VScode和PlatformIO都是免费的,网上有很多安装方法这里就不阐述(PlatformIO安装可以参考https://www.bilibili.com/video/BV1tv411w74d)。
软件安装好之后还需要给你的电脑安装Esp32的运行驱动,同样网上就可以找到~,电脑上通过数据线连接你的单片机并将下面的代码烧录进去即可。
#include <Arduino.h>
#include <BLEDevice.h>
#include <BLEServer.h>
#include <BLEUtils.h>
#include <BLE2902.h>
#include <BluetoothSerial.h>
 // 舵机通道
int channel_PWM = 3;

// 舵机频率,那么周期也就是1/50,也就是20ms ,PWM一共有16个通道,0-7位高速通道由80Mhz时钟驱动,后面8个为低速通道由1Mhz时钟驱动
int freq_PWM = 50;

// PWM分辨率,取值为 0-20 之间  ,这里填写为10,那么后面的ledcWrite 这个里面填写的pwm值就在 0 - 2的10次方 之间 也就是 0-1024 ,如果是要求不高的东西你可以直接拿1000去算了
int resolution_PWM = 10;

// 绑定的IO,在下面的绑定函数里面会用到,绑定之后这个IO就会变成我们PWM的输出口
const int PWM_Pin = 4;  //指定pwm绑定到这个io上输出

#define PMW_EN 0
const int Motor_PWM_PinB = 4;

int interruptCounter = 0;
hw_timer_t *timer = NULL;

BluetoothSerial SerialBT;

uint8_t txValue = 0;                         // txValue 是后面需要发送的一些值
BLEServer *pServer = NULL;                   //BLEServer指针 pServer
BLECharacteristic *pTxCharacteristic = NULL; //BLECharacteristic指针 pTxCharacteristic
bool deviceConnected = false;                //本次连接状态
bool oldDeviceConnected = false;             //上次连接状态

// 如果你有多个esp32蓝牙控制,下面的3个UUID要进行替换 网上直接生成就可以
#define SERVICE_UUID "d3df0c9d-592d-4df4-acac-189106a34867"
#define CHARACTERISTIC_UUID_RX "7fcbf4a0-6b07-40ca-8afe-eaf812643613"
#define CHARACTERISTIC_UUID_TX "ae890421-fea1-42ae-a02c-c167ea1bc1cb"

// 改变蓝牙连接的状态 用于开始或停止发送广播以达到低耗的目的
class MyServerCallbacks : public BLEServerCallbacks
{
    void onConnect(BLEServer *pServer)
    {
        deviceConnected = true;
    };

    void onDisconnect(BLEServer *pServer)
    {
        deviceConnected = false;
    }
};

class MyCallbacks : public BLECharacteristicCallbacks
{
    void onWrite(BLECharacteristic *pCharacteristic)
    {
        std::string rxValue = pCharacteristic->getValue(); //接收信息 比如手机app 或者微信小程序的信息

        if (rxValue.length() > 0)
        { //向串口输出收到的值

            // 开灯
            if (rxValue == "on" || rxValue == "ON" || rxValue == "On" || rxValue == "n" || rxValue == "N" || rxValue == "1" || rxValue == "on\r\n" || rxValue == "ON\r\n" || rxValue == "On\r\n" || rxValue == "n\r\n" || rxValue == "N\r\n" || rxValue == "1\r\n")
            {
                Serial.println("LIGHT_ON");
                delay(100);
                ledcAttachPin(PWM_Pin, channel_PWM);  //将 LEDC 通道绑定到指定 IO 口上以实现输出
                ledcWrite(channel_PWM, 101); // 调试1 随着数字的增大开合度越大
                delay(300);
                ledcWrite(channel_PWM, 77);
                delay(100);
                ledcDetachPin(PWM_Pin);  //这个是解除IO口的pwm输出功能模式
            }

            // 关灯
            if (rxValue == "off" || rxValue == "OFF" || rxValue == "Off" || rxValue == "f" || rxValue == "F" || rxValue == "of" || rxValue == "0" || rxValue == "off\r\n" || rxValue == "OFF\r\n" || rxValue == "Off\r\n" || rxValue == "f\r\n" || rxValue == "F\r\n" || rxValue == "of\r\n" || rxValue == "0\r\n" )
            {
                Serial.println("LIGHT_OFF");
                delay(100);
                ledcAttachPin(PWM_Pin, channel_PWM);  //将 LEDC 通道绑定到指定 IO 口上以实现输出
                ledcWrite(channel_PWM, 57); // 调试2 随着数字的减小开合度越大
                delay(300);
                ledcWrite(channel_PWM, 77);
                delay(100);
                ledcDetachPin(PWM_Pin);  //这个是解除IO口的pwm输出功能模式
            }

        }
    }
};

void IRAM_ATTR TimerEvent()
{
    interruptCounter++;
    if (interruptCounter > 5)
    {
        interruptCounter = 1;
    }
}

void setup()
{
    // 初始化电机
    ledcSetup(channel_PWM, freq_PWM, resolution_PWM); // 设置舵机通道
    timer = timerBegin(0, 80, true);
    timerAttachInterrupt(timer, &TimerEvent, true);
    timerAlarmWrite(timer, 1000000, true);
    timerAlarmEnable(timer); //	使能定时器

    Serial.begin(115200); // 设置串口

    // 创建一个 BLE 设备
    BLEDevice::init("ESP32_Lighter"); // 这里修改蓝牙名称

    // 创建一个 BLE 服务
    pServer = BLEDevice::createServer();
    pServer->setCallbacks(new MyServerCallbacks()); //设置回调
    BLEService *pService = pServer->createService(SERVICE_UUID);

    // 创建一个 BLE 特征
    pTxCharacteristic = pService->createCharacteristic(CHARACTERISTIC_UUID_TX, BLECharacteristic::PROPERTY_NOTIFY);
    pTxCharacteristic->addDescriptor(new BLE2902());
    BLECharacteristic *pRxCharacteristic = pService->createCharacteristic(CHARACTERISTIC_UUID_RX, BLECharacteristic::PROPERTY_WRITE);
    pRxCharacteristic->setCallbacks(new MyCallbacks()); //设置回调

    pService->start();                  // 开始服务
    pServer->getAdvertising()->start(); // 开始广播
    Serial.println(" 等待一个客户端连接,且发送通知... ");
}

void loop()
{
    // deviceConnected 已连接
    if (deviceConnected)
    {

        Serial.println(" connected ");
        pTxCharacteristic->setValue(&txValue, 1); // 设置要发送的值为1
        pTxCharacteristic->notify();              // 广播
        txValue++;                                // 指针数值加1
        delay(2000);                              // 如果有太多包要发送,蓝牙会堵塞
    }

    // disconnecting  断开连接
    if (!deviceConnected && oldDeviceConnected)
    {

        delay(500);                  // 留时间给蓝牙缓冲
        pServer->startAdvertising(); // 重新广播
        Serial.println(" Disconnecting... ");
        oldDeviceConnected = deviceConnected;
    }

    // connecting  正在连接
    if (deviceConnected && !oldDeviceConnected)
    {
        oldDeviceConnected = deviceConnected;
    }

}
Ⅳ.连接线材并运行
只需要根据图中的连线方式:
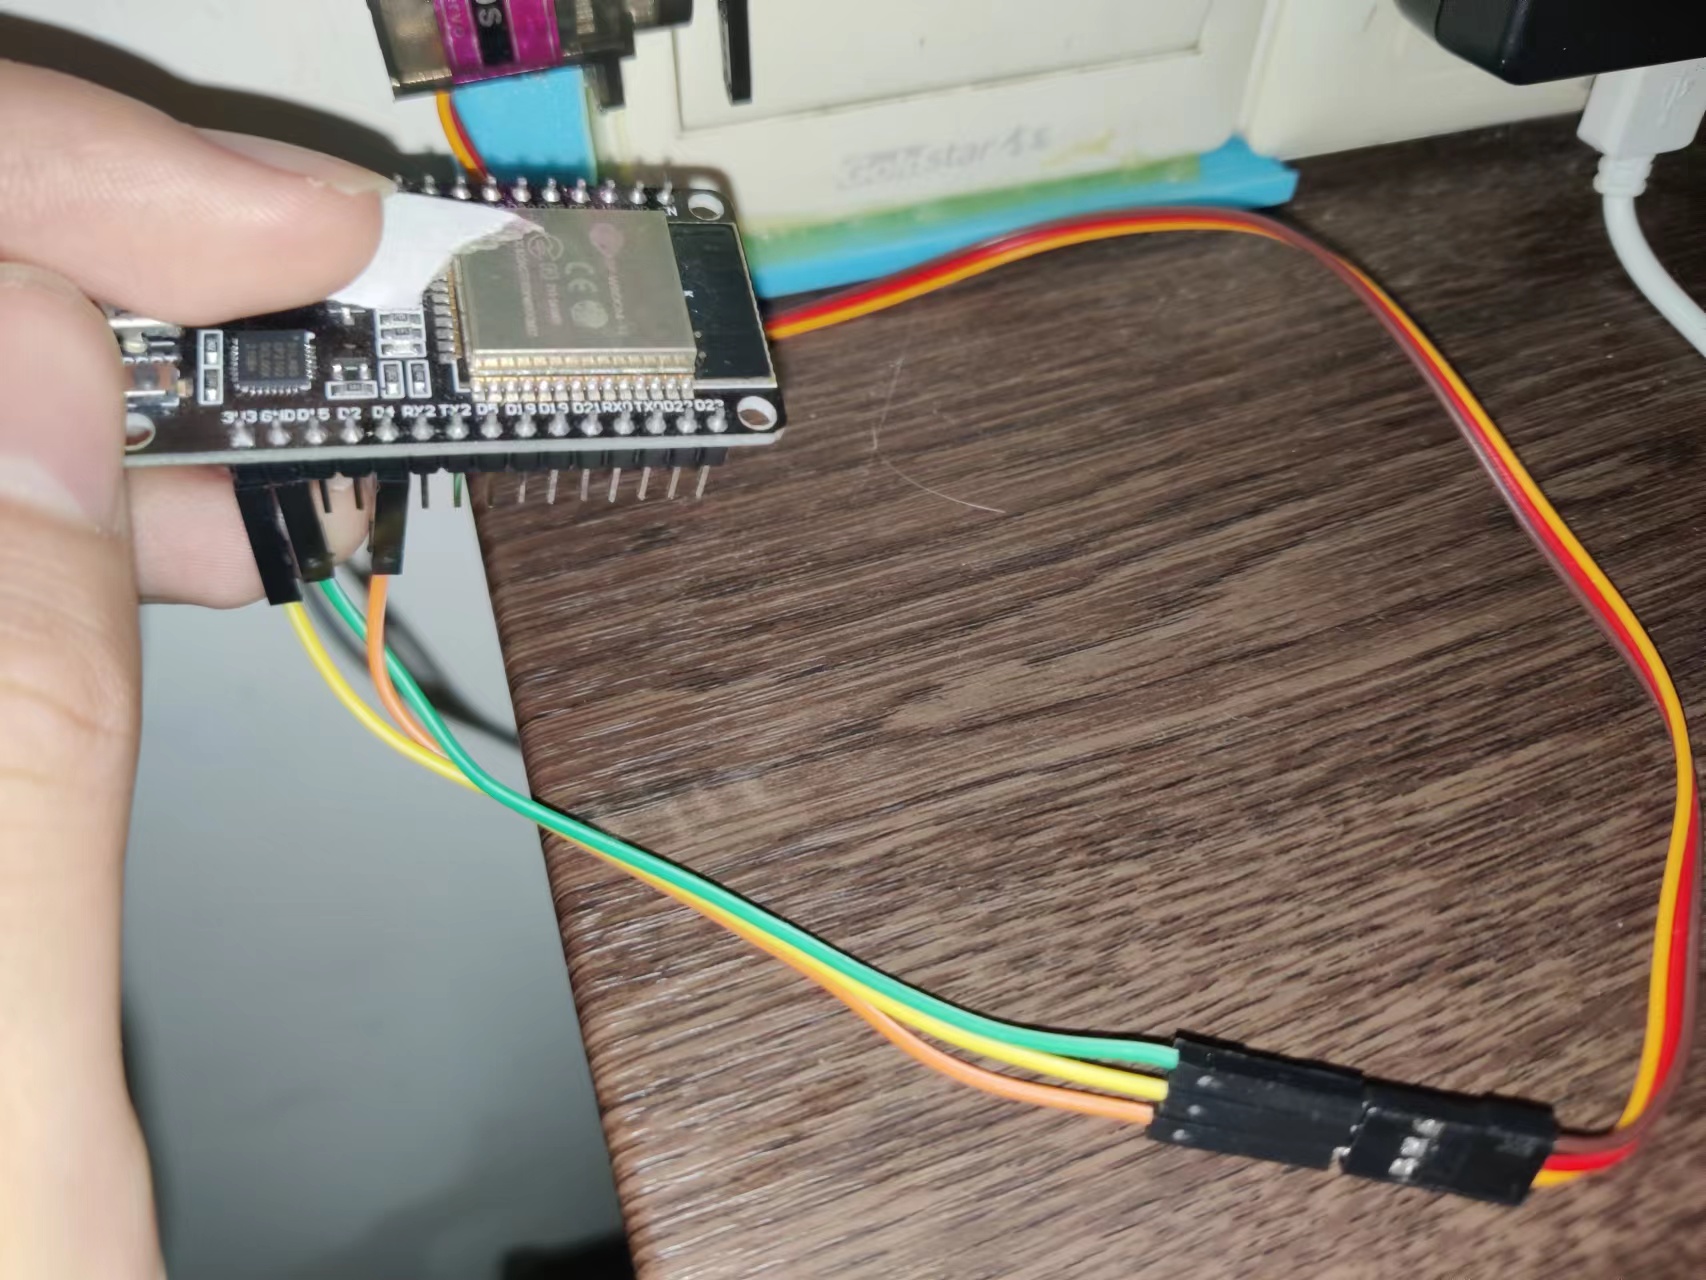

然后通过usb充电线给充电口直接供电,之后打开微信小程序,搜索 蓝牙串口,点进去之后连接你的单片机(默认名字叫做ESP32_Lighter 你也可以在代码里面找到这个更改名称)并连接,在下面输入控制语句:
- 开灯:on 、 ON 、 On 、 n 、 N、 1
- 关灯:off 、 OFF 、 Of 、 o 、 O 、 0
如果一切按照正常发展——你成功地开关了灯,那么恭喜你!你已经成功了!但是一般来说你大概率会失败,你会发现转动的角度可能不够,或者太多导致开关灯异常,那么请接着往下看。
Ⅴ.调试代码:
当你烧录好代码之后,你以为结束了,实际上才刚刚开始!在我完成这个远程灯光控制的时候,耗时间最多的不是打代码,而是调试!让我们先来看看关键的代码:
            // 开灯
            if (rxValue == "on" || rxValue == "ON" || rxValue == "On" || rxValue == "n" || rxValue == "N" || rxValue == "1" || rxValue == "on\r\n" || rxValue == "ON\r\n" || rxValue == "On\r\n" || rxValue == "n\r\n" || rxValue == "N\r\n" || rxValue == "1\r\n")
            {
                Serial.println("LIGHT_ON");
                delay(100);
                ledcAttachPin(PWM_Pin, channel_PWM);  //将 LEDC 通道绑定到指定 IO 口上以实现输出
                ledcWrite(channel_PWM, 101); // 调试1 随着数字的增大开合度越大
                delay(300);
                ledcWrite(channel_PWM, 77);
                delay(100);
                ledcDetachPin(PWM_Pin);  //这个是解除IO口的pwm输出功能模式
            }

            // 关灯
            if (rxValue == "off" || rxValue == "OFF" || rxValue == "Off" || rxValue == "f" || rxValue == "F" || rxValue == "of" || rxValue == "0" || rxValue == "off\r\n" || rxValue == "OFF\r\n" || rxValue == "Off\r\n" || rxValue == "f\r\n" || rxValue == "F\r\n" || rxValue == "of\r\n" || rxValue == "0\r\n" )
            {
                Serial.println("LIGHT_OFF");
                delay(100);
                ledcAttachPin(PWM_Pin, channel_PWM);  //将 LEDC 通道绑定到指定 IO 口上以实现输出
                ledcWrite(channel_PWM, 57); // 调试2 随着数字的减小开合度越大
                delay(300);
                ledcWrite(channel_PWM, 77);
                delay(100);
                ledcDetachPin(PWM_Pin);  //这个是解除IO口的pwm输出功能模式
}在你的完整代码上找到关键代码段 调试1 和 调试2,尝试通过更改2个调试的数字(代码里面写的是101 和 57)更改舵机的转动角度,从而使得舵机能使出恰当的力度开关灯。
Ⅵ.最后注意事项
经过了一天的尝试,你或许已经成功地安装上去了,恭喜你!但是在我开发的过程中发现了许多的问题,大家一定要注意!
- usb线一定不要选劣质的线,要保证输电良好的线(你可以尝试用这条线给你手机充电,充得超慢的就是劣质线)来给Esp32供电,否则会发生非常多的问题,比如:发送信号没反应、反复重新启动、舵机转动后卡住、连不上蓝牙等非常多情况,曾经这些情况困扰了我一个月,没想竟是贫穷所限制......
- 蓝牙控制的方式好处就是不需要服务器,本地都能直接控制,但是坏处也很明显——Esp32需要整天都在搜索蓝牙设备,很耗电(大概开12小时消耗一个5000毫安充电宝的电量),为了节省电费,于是乎我开发了另一个版本WIFI控制版(需要搭建迷你个人网站),我将在下篇文章给大家分享~
Ⅶ.最后成品展示


Comments | NOTHING